Sod And Turf Harrisburg PA are both grass coverings that can be used to replace bare lawn areas, prevent soil erosion or enhance the beauty of your property. The differences are in how they are grown and installed.
Sod is ready to use right away, whereas turf requires some time to grow and establish roots. Both offer different benefits depending on your needs and the climate in your area.
Sod is a beautiful addition to any landscape. Not only does it add instant curb appeal, but it also saves time because there is no need to wait for grass seed to grow. There are many different kinds of sod, using both warm and cool season grasses. There are even sod varieties designed for specific light conditions, such as full sun or shade.
Sod has a very long history. It was first used in Europe to establish pastures for livestock, but later it became popular on large European estates to enhance the aesthetics of their grounds.
Originally, sod was made up of strips of low-growing grasses that were placed together with the adhering soil. These were the earliest turfs maintained for recreation, but they weren’t as sophisticated as modern sod. By the 1100s, areas of lawn were being grazed and cut with scythes, and turf was a common fixture in some parks.
It was around this time that settlers brought sod with them to their new homes. It was also the time that the first sod cutter was invented, which allowed for much more efficient production of sod.
Once the technology to produce sod was perfected, it became a very popular way to create beautiful lawns. It wasn’t just for wealthy estates, though; the average person could afford to have a lush green yard, too.
As sod became more available, people began to use it for sports fields, golf courses and other recreational facilities. The turf industry exploded, and sod was soon widely used throughout the country.
The word sod is often confused with turf, but the two words have very different meanings. Sod refers to both the soil base and the established grass, while turf is a term generally used in America and Australia, and limited primarily to agricultural uses.
Today, sod is typically grown on a sod farm and then shipped to the home or commercial site. The sod is then cut, rolled and stacked to be ready for installation. Sod is more convenient than laying grass seed because it doesn’t take as long to establish and there is no need for watering or weed control.
Choosing Sod
A beautiful garden adds to the value of your home. It can also be a source of pleasure and relaxation. There are two methods for achieving a lush lawn: sowing grass seeds or laying sod. While both have their merits, sod provides a quicker, more aesthetically pleasing option for some homeowners. Choosing the right sod is critical to success, however. Different varieties of grass have varying water and maintenance requirements, and some can be more susceptible to diseases in your area. Evaluate how much time you are willing to devote to maintenance and choose a sod type that fits those needs.
The sod installation process is easier if the soil has been prepared prior to starting. Soil should be loose, and a good aerator can help reduce hardpan and prevent crusting. It is also recommended that the top 1/2 inch of the soil be kept moist until the sod roots develop, which typically takes 14 days. Sod can be installed at any point in the year, though spring and fall are optimal times for sod establishment.
Once laid, sod is usually ready for normal use within a few weeks of installation once the roots are firmly established. However, it is important to avoid heavy foot traffic on the sod until this time. It is also crucial to protect the sod from the sun, especially in the first few weeks after installation.
Some sod types are able to withstand more sunlight than others, so the amount of sunlight your lawn gets should also influence your sod selection. For example, Bermuda is great for full-sun lawns, while tall fescue is best for shaded areas. Also, consider how much foot traffic your yard will receive and choose a sod type that can handle this load.
Erosion Control: Sod is a preferred method for erosion control, particularly on slopes or in areas that are prone to runoff. Its dense growth helps to control soil movement and prevent weeds, while its root system stabilizes the soil to help prevent mud or dust. Weed Suppression: Sod is an effective weed suppressant and can be used in areas where weeds are difficult to grow through seed.
Installation
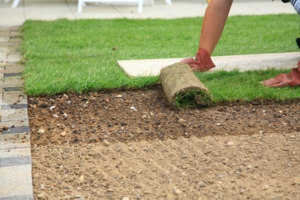
Sod provides instant curb appeal for your property and is used in a variety of residential and commercial applications. It is grown on a farm and harvested in small squares or rectangular slabs, or in large 4-foot-wide rolls. Sod can be laid spring through fall and during winter in mild climates. It offers an advantage over seeding because it avoids the problem of weeds sprouting in bare soil and can be laid year-round.
The first step is to prepare the soil. Soil should be tested for pH, nutrients and aeration. The results will help you determine if you need to amend the soil before installing sod. You can purchase soil testing kits from garden centers or your local extension office. The test results will tell you precisely what to add and in what quantity.
Soil that is not amended properly can prevent the sod roots from establishing well and can cause problems when mowing or watering. Before sod is installed, existing grass and weeds must be killed with a nonselective herbicide such as Round-up. It is also a good idea to till the soil to break up any clay-like pockets and to ensure that nutrients are distributed evenly.
Once the sod is delivered it must be laid within a few hours after it’s cut and transported. This allows the sod to bind to the soil and become a permanent part of your yard.
When you start laying the sod, work with whole pieces and try to minimize cutting. Begin the first row at a straight edge, such as the corner of your patio, driveway or flower bed. Then, lay the sod in a brick wall pattern, staggering the seams as you go. If you have to cut a piece, make sure it is trimmed flush with the previous row to avoid having an unsightly seam.
During the first week of sod growth, it’s essential to water the area daily to establish the root system. The soil should be kept moist, but not wet or muddy, to minimize disease and fungal problems. After that, water less frequently, but more deeply to encourage deep rooting. Ideally, the sod should be watered in the morning to minimize the risk of fungal problems from exposure to the sun’s heat.
Maintenance
Sod provides a quick, weed free alternative to planting grass seed and is ideal for repairing damaged areas of your lawn or preventing soil erosion. It is also used for professional sports turf and golf courses. Sod requires some maintenance, however. It is recommended to fertilize new sod 3-4 times during the growing season using a slow-release form of Nitrogen.
A good time to plant sod is in the fall or spring. Cool-season sod species such as tall fescue and Kentucky bluegrass will thrive best when planted during these seasons. Warm-season sods such as zoysia, tall fescue and bermuda can be installed in the summer; but it’s important to ensure that your sod receives enough water for roots to develop during this hot period.
When you begin to water your sod, it is vital that you water for at least a half hour each time to prevent the roots from drying out. Depending on the weather and your climate, it may be necessary to water more often to keep the sod and soil properly moist. When you are watering your sod, it is recommended that you soak the ground instead of spraying. This will help to avoid fungus and encourage the sod’s root development.
Watering should be done in the morning or night, as this will minimize evaporation and increase the amount of moisture that penetrates to the roots. A paling color on the sod can indicate that it isn’t obtaining sufficient moisture and needs to be watered thoroughly until the color returns to its normal shade.
Sod that isn’t receiving enough water will turn brown and can go dormant in the summer if not rehydrated. This is due to lack of oxygen in the roots as a result of not having enough moisture.
It’s also very important to keep pets, children and anyone else off of the sod until it has fully taken root. This will allow the sod to establish itself and prevent any damage from being caused by foot traffic. Walking on sod too early can cause it to become unrooted or even die.